Configure Various Browsers For Selenium Webdriver
Configure Internet Explorer For Selenium Webdriver
Step 1 : Download IEDriverServer.exe
For running selenium internet explorer test, you need IEDriverServer.exe. You can download It from http://www.seleniumhq.org/download/
Save IEDriverServer.exe In your drive.
Step 2 : Configure IE Browser To Resolve Expected Errors
Before running your software automation selenium internet explorer test, You need to configure your IE browser to resolved bellow given 2 common errors which people are facing occasionally.
Error 1 : Exception in thread "main" org.openqa.selenium.remote.SessionNotFoundException: Unexpected error launching Internet Explorer. Protected Mode settings are not the same for all zones. Enable Protected Mode must be set to the same value (enabled or disabled) for all zones. (WARNING: The server did not provide any stacktrace information).
Error 2 : Exception in thread "main" org.openqa.selenium.remote.SessionNotFoundException: Unexpected error launching Internet Explorer. Browser zoom level was set to 200%. It should be set to 100% (WARNING: The server did not provide any stacktrace information).
Solution to resolve above errors Is as bellow.
Solution To Resolve Error 1 : Enable protected mode for all zones
You need to enable protected mode for all zones from Internet Options -> Security tab. To enable protected mode for all zones
-
Open Internet Explorer browser.
-
Go to menu Tools -> Internet Options.
-
Click on Security tab.
-
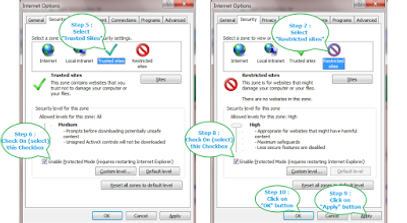
Select Internet from "Select a zone to view or change security settings" and Select(check) check box "Enable Protected Mode" from In the "Security level for this zone" block as shown In bellow Images.
-
Apply same thing for all other 3 zones -> Local Internet, Trusted Sites and Restricted Sites as shown In bellow Images.
This setting will resolve error related to "Protected Mode settings are not the same for all zones."
Solution To Resolve Error 2 : Set IE browser zoom level to 100%
By default, IE browser's zoom level will be 100%. But If someone has changed It to 200% or any other level then you will face error during webdriver software test execution In IE browser and your test will fail. You need to set IE browser's zoom level 100%.
To Set IE browser's zoom level 100%
-
Open Internet Explorer browser.
-
Go to menu View -> Zoom -> Select 100% as shown In bellow Image.
This setting will resolve error related to "Browser zoom level was set to 200%. It should be set to 100%".
Step 3 : Execute First WebDriver Test In Internet Explorer browser
Now you are all set to execute first selenium webdriver In IE browser. I have created sample test to run test In IE browser. Execute bellow given sample calc test In eclipse and verify Its output In console.


Java Example
.Net Example
Configure Chrome Browser For Selenium Webdriver
Steps for launching Chrome Browser using WebDriver
-
Download zip file of chromedriver for Windows from <location>
-
Unzip downloaded Chromedriver for Windows and find the absolute path of chromedriver.exe
-
Now set Property of System by using this line
System.setProperty(“webdriver.chorme.driver”,”E:\\<User>\\workspace\\chromedriver_win_26.0.1383.0\\chromedriver.exe”);
and after this line write your traditional line to launch the browser like this
WebDriver driver = new ChromeDriver();
An example code in Java:-
import org.junit.After;
import org.junit.Before;
import org.junit.Test;
import org.openqa.selenium.By;
import org.openqa.selenium.WebDriver;
import org.openqa.selenium.chrome.ChromeDriver;
public class Chrome {
WebDriver driver;
@Before
public void launchChrome()
{
System.setProperty("webdriver.chrome.driver", "E:\\Glasdon
Falcao\\workspace\\chromedriver_win_26.0.1383.0\\chromedriver.exe");
driver = new ChromeDriver();
}
@Test
public void testChrome()
{
driver.get("http://www.google.co.in");
driver.findElement(By.id("gbqfq")).sendKeys("Selenium");
}
@After
public void kill()
{
driver.close();
driver.quit();
}
}
Configure Firefox Browser For Selenium Webdriver
The first step towards configuration of Firefox in Selenium Webdriver is making a firefox profile.
What is Firefox profile and why do I need it?
Firefox saves your personal information such as bookmarks, passwords, and user preferences in a set of files called your profile, which is stored in a separate location from the Firefox program files. You can have multiple Firefox profiles, each containing a separate set of user information. The Profile Manager allows you to create, remove, rename, and switch profiles.
The default Firefox profile is not very automation friendly. When you want to run automation reliably on a Firefox browser it is advisable to make a separate profile. Automation profile should be light to load and have special proxy and other settings to run good test.
You should be consistent with the profile you use on all development and test execution machines. If you used different profiles everywhere, the SSL certificates you accepted or the plug-ins you installed would be different and that would make the tests behave differently on the machines.
Finding Your Profile Folder
Your profile folder’s location depends on the operating system you use. The following table shows the typical location of the default profile:
| Operating System | Profile Folder Path |
| Windows XP / 2000 / Vista / 7 | %AppData%MozillaFirefoxProfilesxxxxxxxx.default |
| Linux | ~/.mozilla/firefox/xxxxxxxx.default/ |
| Mac OS X | ~/Library/Application Support/Firefox/Profiles/xxxxxxxx.default/ |
Two notable clarifications:
-
The %AppData% string is actually a special Windows variable, pointing to your “Application Data” path. This is typically of the form:C:Documents and Settings{User Name}Application Data
-
The xxxxxxxx string preceding each profile name. This string is simply a collection of 8 random numbers and characters, used to ensure that each profile is unique. Firefox automatically prepends a randomized string to any new profile for you, so you never need to worry about creating this portion of the name.
Creating a New Profile
Creating a New Firefox profiles and use the same in the Test script involves three steps process. First you need to Start the Profile Manager, second is to Create a New Profile and third is to use the same profile in Test scripts.
Step 1: Starting the Profile Manager
1) At the top of the Firefox window, click on the File menu and then select Exit.
2) Press ‘ + R’ or click on the Windows Start Menu (bottom left button) and then select Run.
3) In the Run dialog box, type in: ‘firefox.exe -p' and then Click OK.
Note: If the Profile Manager window does not appear, it may be opened in the background. It needs to be closed properly, you may use Ctrl+Alt+Del program to kill it. If it still does not open then you may need to specify the full path of the Firefox program, enclosed in quotes;
For Example:
-
On 32-bit Windows: "C:Program FilesMozilla Firefoxfirefox.exe" -p
-
On 64-bit Windows: "C:Program Files (x86)Mozilla Firefoxfirefox.exe" -p
4) The Choose User Profile window will look like this.
Step 2: Creating a Profile
1) Click the ‘Create Profile…’ button on the ‘Firefox – Choose User Profile’ window that comes up.
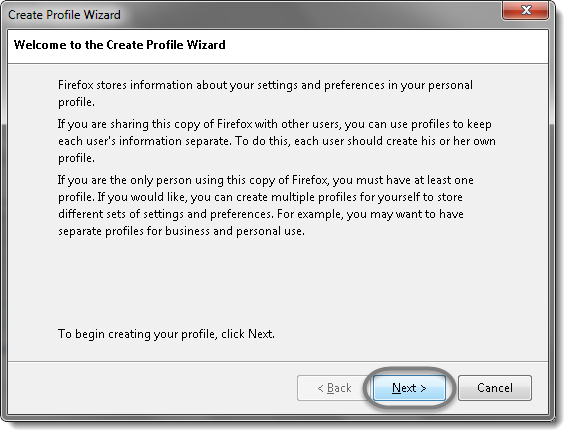
2) Click ‘Next >’ in the ‘Create Profile Wizard’ window that comes up.
3) Type in a new name ‘profileToolsQA’ in the ‘Enter new profile name’ box and click ‘Finish’.
4) ‘Choose User Profile’ window will display the newly created profile in the list.
5) Click on the ‘Start Firefox’ box. Firefox will start with the new profile.
Note: You will notice that the new Firefox window will not show any of your Bookmarks and Favorite icons.
Note: The last selected profile will then start automatically when you next start Firefox and you will need to start the Profile Manager again to switch profiles.
Step 3: User Custom Profile in Selenium
Once the Automation Profile is created, it needs to be called in the Test scripts. You can now add the below code to your Test scripts to Instantiating the Firefox Driver:
ProfilesIni profile = new ProfilesIni();
FirefoxProfile myprofile = profile.getProfile("profileToolsQA");
WebDriver driver = new FirefoxDriver(myprofile);